
Kali Forms Commerce turns a form into a small product, donation, and payment flow. Products and discounts are configured per form; Commerce fields put those values in the form; Stripe or PayPal provides the checkout; and completed attempts appear under Kali Forms > Payments.
How Commerce is organized
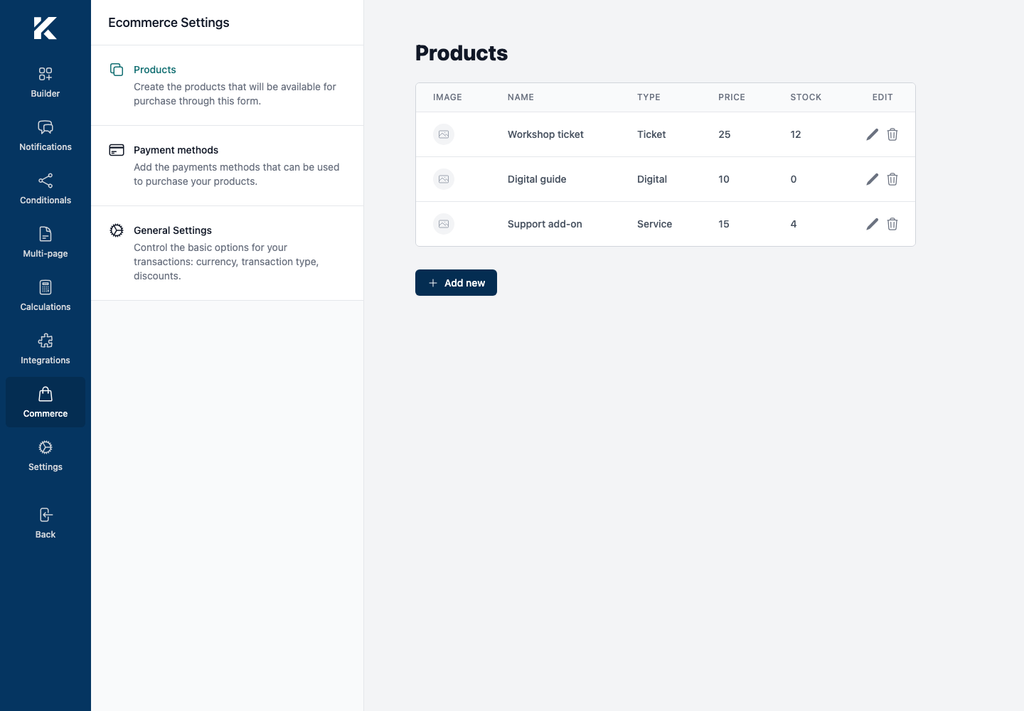
Open Kali Forms > All forms, edit the form, and select Commerce. The installed builder has four areas:
- Products — the form-specific product catalog;
- Payment methods — PayPal, Stripe, and Wire Transfer enable switches, provider credentials, and the Stripe webhook secret;
- General Settings — the Live transactions switch, separate PayPal and Stripe currencies, discount codes, and discount rules;
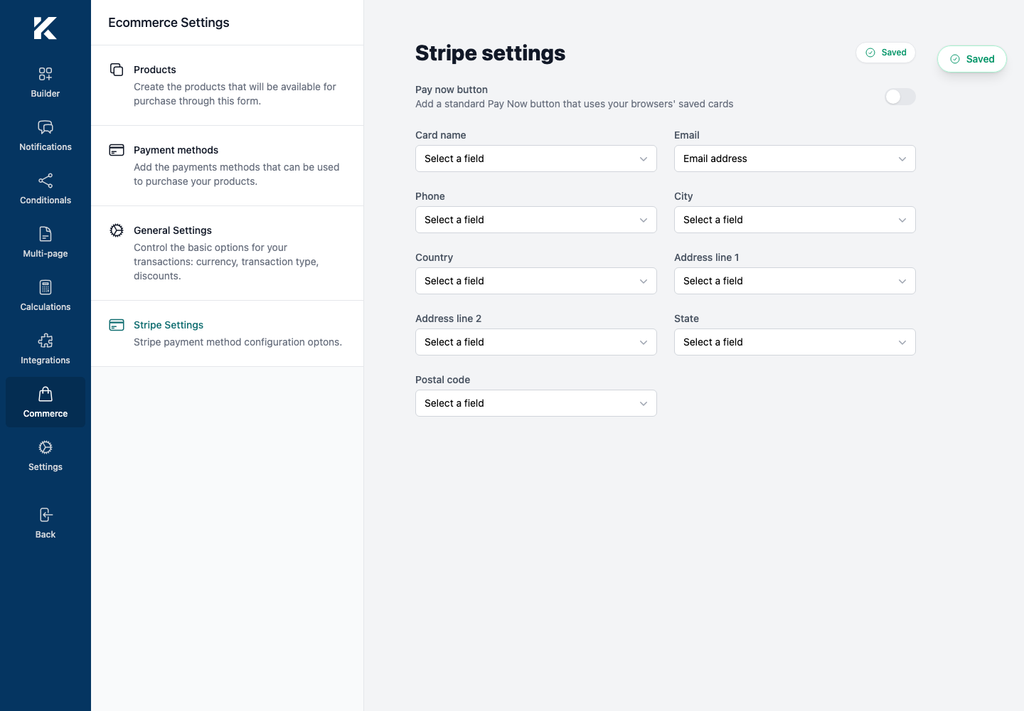
- Stripe Settings — Stripe customer-field mappings and the site-specific webhook endpoint.
Create and configure products
- Open Commerce > Products.
- Select Add new.
- Enter the Product name and numeric Price.
- Optionally enter Type. In this build, Type is descriptive text shown in the catalog; it does not create tax, shipping, or download behavior.
- Optionally select an Image from the WordPress media library.
- Enable Track stock only for limited inventory, then enter Stock.
- Save the product.
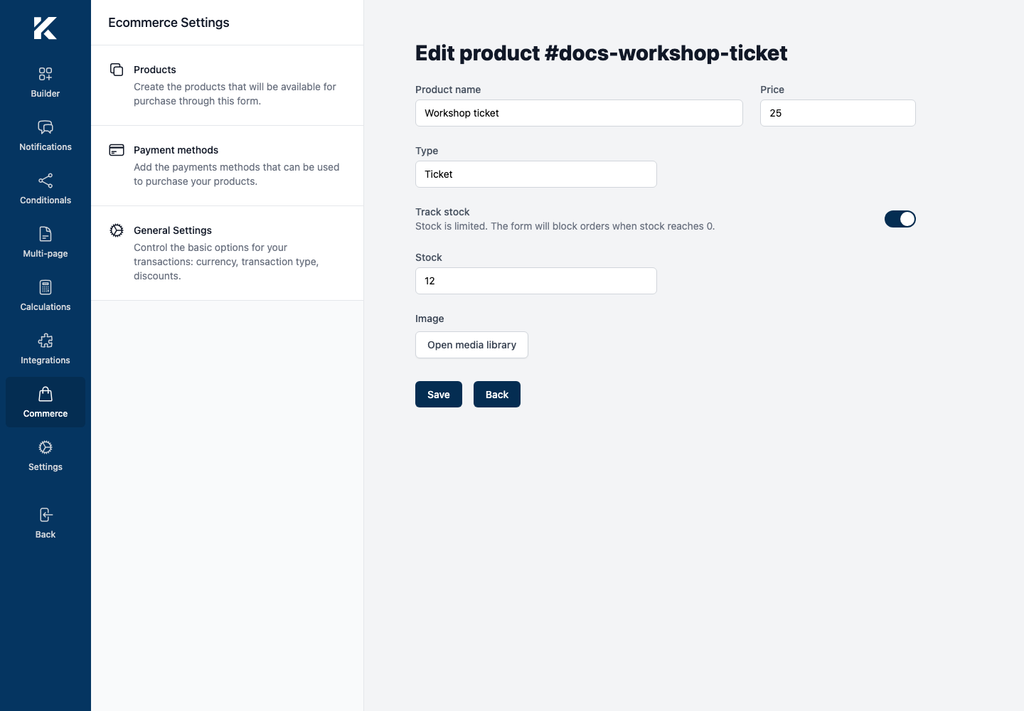
Products belong to the current form. Track stock off means unlimited stock, even if the catalog displays 0. With tracking on, a zero-stock product is removed from the rendered form and cannot be purchased. The installed server checks stock before creating a payment and decrements it once after a confirmed Stripe or PayPal payment, using idempotency guards to avoid a double decrement.
Use non-negative prices. Product price and stock are stored as plain numeric values; Commerce does not add tax, shipping, recurring billing, or fulfillment.
Add Commerce fields to the form
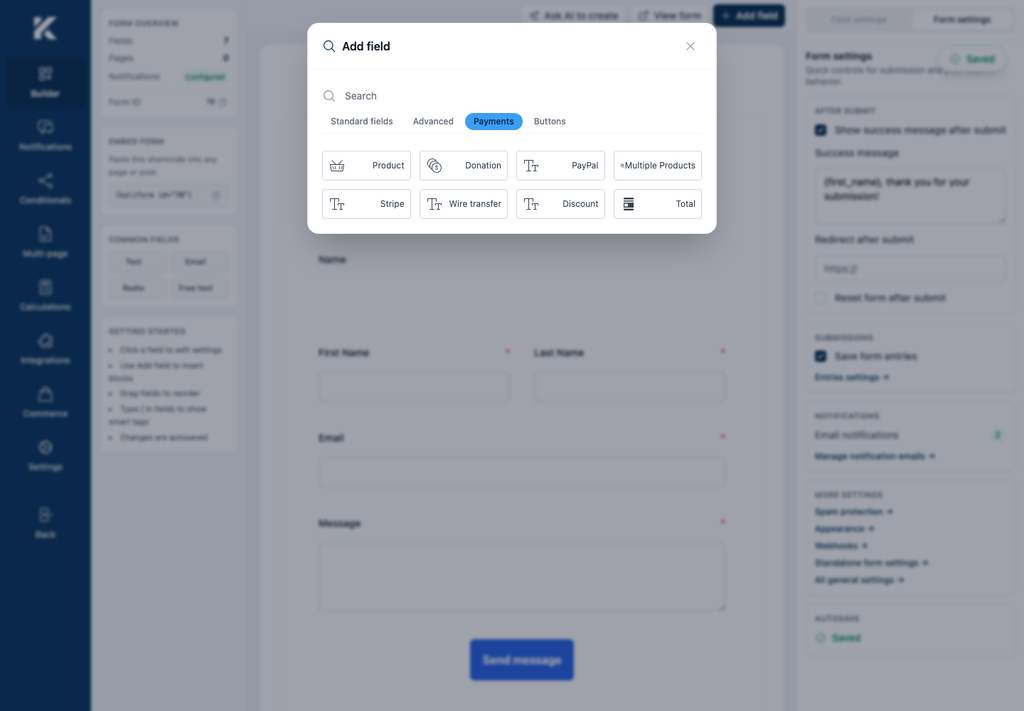
Open Builder, select Add field, then expand Payments. This installed catalog includes Product, Multiple Products, Donation, Discount, Total, PayPal, Stripe, and Wire Transfer fields.
Product
Use Product for one required catalog item. Select the product in the field settings. On the front end it appears as a fixed, read-only line item and contributes its price to the total.
Multiple Products
Use Multiple Products for optional or selectable catalog items. Select one or more products in the field settings. Each appears as a checkbox on the front end; only checked products contribute to the total. The field also supports caption, description, default, and required settings.
Donation
Use Donation for an additional amount. Configure:
- Price type: Custom — the visitor enters a numeric amount;
- Price type: Fixed — the visitor selects one of the configured donation choices;
- Donation name — the line-item name used in payment data;
- caption, description, default, required, and the fixed amount choices.
Discount
Use Discount to show a code input. Create codes under Commerce > General Settings > Discounts. Code matching is case-insensitive and accepts codes separated in the editor by commas, spaces, or semicolons.
Each code group has an amount and a Fixed or Percentage type. Optional rules can limit it by quantity, exact date, before date, or after date. Discounts never reduce the calculated total below zero.
Total
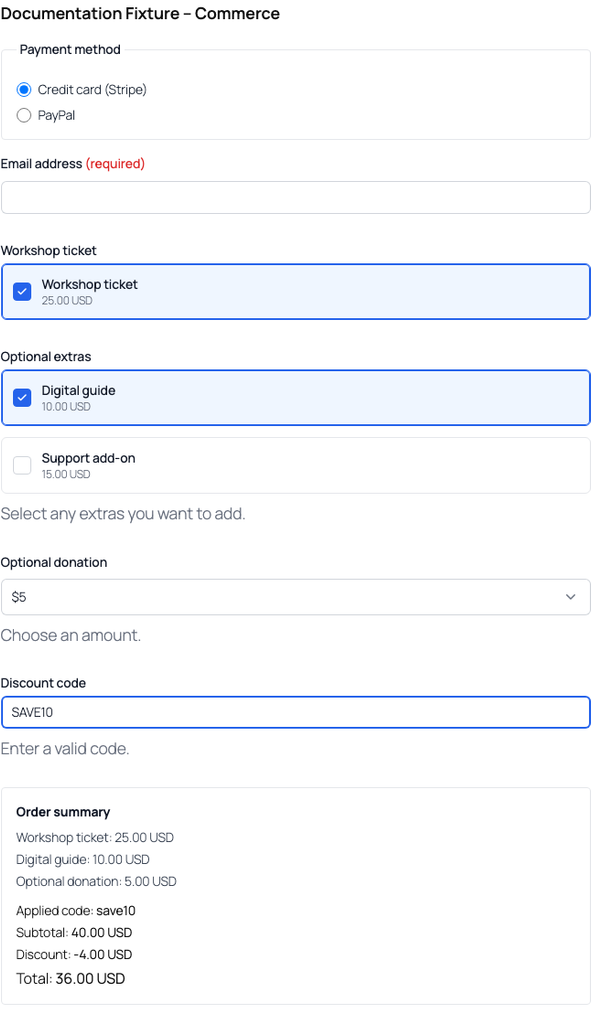
Use Total to render an order summary containing selected line items, subtotal, discount, and total. If the form has no separate Discount field, this renderer adds its own discount-code input.
Stripe and PayPal
Add a Stripe field for Stripe card checkout and a PayPal field for PayPal Checkout. If both are present, the form asks the visitor to choose a payment provider and renders only the selected provider’s control.
Adding a provider field is not enough: enable the same provider under Commerce > Payment methods, configure its matching credentials and currency, and keep the form in test mode until sandbox verification passes.
Configure test and live mode
Commerce > General Settings > Live transactions is a form-wide switch:
- Off selects Stripe sandbox/test keys and the PayPal sandbox client ID.
- On selects Stripe live keys and the PayPal live client ID.
Save both environments’ credentials before a controlled go-live. Never combine a sandbox credential with live mode or a live credential with test mode. Stripe keeps sandbox and live objects separate, and PayPal issues separate app credentials for Sandbox and Live.
Configure Stripe
What you need
- a verified Stripe account for the business receiving funds;
- a sandbox publishable key and sandbox secret key;
- a live publishable key and live secret key for production;
- a webhook endpoint and its signing secret;
- an Email field in the form, mapped under Stripe Settings.
Stripe calls browser-safe keys publishable keys (pk_test_ or pk_live_) and server credentials secret or restricted keys. Only publishable keys may be exposed in the browser. Stripe recommends restricted keys for most new server-side uses, but this Kali Forms UI labels and expects Stripe sandbox secret key and Stripe secret key; confirm compatibility before substituting a restricted key. Stripe’s API key reference and current creation steps are authoritative.
Obtain Stripe keys
- Sign in to the Stripe Dashboard and open API keys.
- Work in a Stripe sandbox and copy its Publishable key into Stripe sandbox key.
- For the server key, use a compatible existing sandbox secret key or select Create secret key, complete Stripe’s verification, name the key, copy it once, and store it securely.
- In Kali Forms, paste that sandbox server key into Stripe sandbox secret key.
- When sandbox testing is complete, switch the Stripe Dashboard to live mode.
- Copy the live publishable key into Stripe key and the compatible live server key into Stripe secret key.
Stripe’s current Dashboard can create, reveal, expire, and rotate keys from API keys. Live secret values may be shown only once. Follow Stripe’s key-management procedure, not screenshots or an older menu path.
Configure the Stripe webhook
This build uses one signed Stripe webhook endpoint and no PayPal webhook. Under Commerce > Payment methods or Stripe Settings, copy the displayed URL. It has this shape:
https://example.com/wp-json/kaliforms/v2/payments/stripe/webhook
Then:
- In Stripe Dashboard, open Workbench > Webhooks.
- Select Create an event destination.
- Choose Account for payments in this Stripe account.
- Select the API version, then subscribe to:
payment_intent.succeededpayment_intent.payment_failedpayment_intent.canceledcharge.refunded
- Choose Webhook endpoint, paste the HTTPS Kali Forms endpoint, and create the destination.
- Open the new endpoint, reveal/copy its signing secret, and paste it into Stripe webhook signing secret.
- Save the form.
Stripe requires a publicly accessible HTTPS endpoint and recommends signature verification; this build verifies the raw payload, Stripe-Signature header, and endpoint-specific secret. Follow Stripe’s current webhook registration and signature guide.
Configure PayPal
What you need
- a PayPal developer account;
- a sandbox REST app associated with a sandbox Business account;
- its sandbox client ID;
- a live PayPal Business account and a live REST app/client ID for production;
- a Personal sandbox account for the buyer test.
The installed Kali Forms settings require PayPal client IDs only. Although PayPal also generates a client secret for REST API calls, this build does not provide a PayPal secret field. Never paste the secret into the client-ID field.
Obtain PayPal sandbox credentials
- Sign in to the PayPal Developer Dashboard.
- Open Apps & Credentials and select Sandbox.
- Use the Default Application or select Create App, choose the Merchant type and the sandbox Business account, then create it.
- Open the app and copy its Client ID into PayPal sandbox client ID in Kali Forms.
- Keep PayPal’s generated client secret confidential; Kali Forms does not request it.
- In PayPal Dashboard, open Testing Tools > Sandbox Accounts. Use View/Edit Account to retrieve a Personal buyer account’s synthetic login and a Business merchant account’s login.
PayPal documents the exact current flow in Get started with PayPal REST APIs and explains safe simulated transactions in its Sandbox testing guide.
Obtain PayPal live credentials
- Complete sandbox testing and sign in to the Developer Dashboard with the receiving merchant’s PayPal Business account.
- Open Apps & Credentials and switch from Sandbox to Live.
- Select Create App, name the live REST app, and create it.
- Copy the live Client ID into PayPal live client ID.
- Keep the live client secret secure even though Kali Forms does not use it.
PayPal’s current official move-to-production procedure should be checked immediately before launch because account approval and feature availability can vary.
What payment data Kali Forms stores
Kali Forms > Payments is an administrator-only log. This installed build stores, when available:
- provider, amount, currency, status, description, and live/test mode;
- payer/receipt email;
- provider payment ID and capture/transaction ID;
- form ID and submission ID;
- expected subtotal, discount, amount, and selected product details;
- who or what last changed the record and when.
Stripe status is updated from PaymentIntent confirmation and signed webhook events. Common stored values include pending/awaiting confirmation, processing, succeeded, payment failed, cancelled, and refunded. A form submission is finalized only after Stripe can be verified as succeeded.
PayPal Checkout captures in PayPal’s JavaScript SDK, then sends the returned capture data to the Kali Forms confirmation endpoint. The local log must be COMPLETED before the submission is finalized. This build has no PayPal webhook endpoint, so reconcile PayPal transactions with PayPal’s merchant activity during testing and operational reviews.
Administrators can manually change a stored payment status. That changes the local record only; it does not capture, cancel, or refund the provider transaction. Perform financial actions in Stripe or PayPal, then confirm the local record reflects the provider result.
Kali Forms does not store raw card details; Stripe Elements handles card entry. Payment logs and normal form submissions can still contain personal and financial metadata, so restrict WordPress administrator access, use HTTPS, set an appropriate retention policy, and include these systems in privacy and incident-response procedures.