
The Kali Forms builder uses a full-screen interface so you can create and configure a form without switching between separate WordPress admin pages. This overview explains where to find the builder navigation, form information, canvas, fields, and settings.
In the WordPress dashboard, go to Kali Forms > All forms, then select a form. You can also go to Kali Forms > Add new form to create one.
The builder takes over the WordPress admin screen. Select Back in the lower-left corner when you want to return to the forms list.
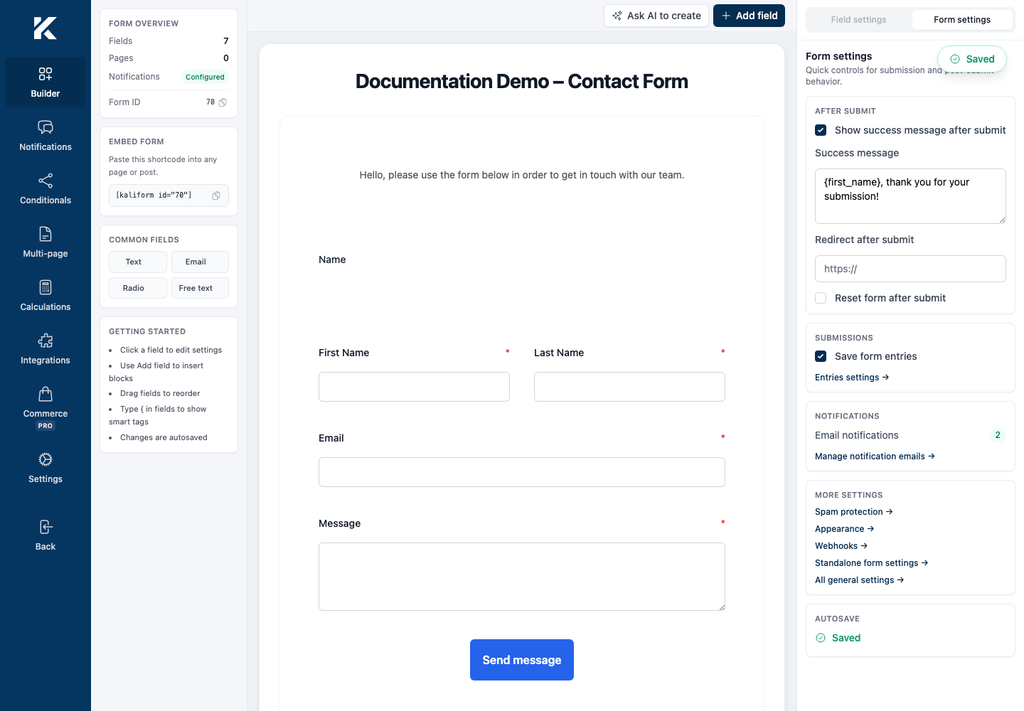
The dark navigation rail on the left organizes form configuration into the following areas:
- Builder: Add fields, arrange the layout, and configure field-level or form-level settings.
- Notifications: Create and manage email notifications sent after a submission.
- Conditionals: Show, hide, or change fields based on submitted values.
- Multi-page: Split a form into pages and configure page navigation.
- Calculations: Create formulas that use values from form fields.
- Integrations: Connect the form to available services and extensions.
- Commerce: Configure products and payment-related options. Commerce features require Kali Forms Pro and the relevant extensions.
- Settings: Open general, appearance, spam, scripting, webhook, validation, standalone form, and other available settings.
- Back: Leave the takeover interface and return to the WordPress admin area.
Next comes a set of helping data:
- Form overview: displays the number of fields, the number of pages, whether notifications are configured, and the form ID.
Use this information to confirm that the current form has the expected structure. - Embed form: displays the shortcode for the current form. Copy this shortcode when you need to add the form to a WordPress page or post.
- Common fields: provides shortcuts for frequently used fields, including Text, Email, Radio, and Free text. Selecting one adds it directly to the form.
For the complete field catalog, select Add field at the top of the builder. - Getting started: summarizes common builder interactions: select a field to edit it, drag fields to reorder them, use Add field to insert fields, and type
{in supported inputs to find Smart Tags.
Work on the form canvas
The center of the builder is the form canvas. It shows the form approximately as its fields will be arranged on the front end.
On the canvas, you can:
- select the form title to rename it;
- select a field to open its settings;
- drag fields to reorder them;
- resize supported fields;
- duplicate or remove the selected field;
- review required-field indicators and button labels.
Use Ask AI to create to generate a draft or Add field to open the full field catalog.
Switch between Field settings and Form settings
The panel on the right changes according to what you are configuring.
Field settings
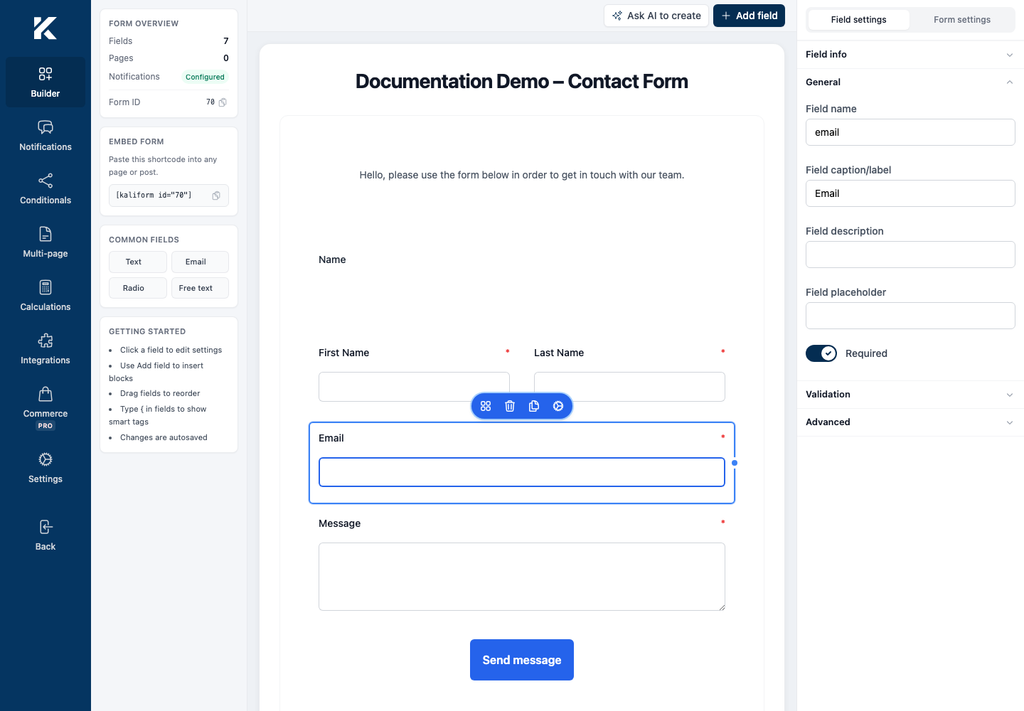
Select a field on the canvas to open Field settings. The available controls depend on the field type and can include:
- field name;
- caption or label;
- description;
- placeholder;
- required status;
- validation;
- advanced options.
Form settings
Select Form settings to configure behavior that applies to the form as a whole. The quick settings panel includes:
- success message and redirect behavior;
- form reset after submission;
- entry storage;
- notification status;
- links to additional form settings;
- autosave status.
Kali Forms saves builder changes automatically. Before leaving the builder, check the Autosave section and wait until it displays Saved or All changes saved.