
With Kali Forms you can configure one or multiple email notifications for each form submission. In this article we will present all the configuration fields available for the plugin specific emails.
Starting with version 1.6.0 we have set the Guided emails feature as the new standard. You just need to answer a few simple questions in the wizard and this will generate a properly configured email.
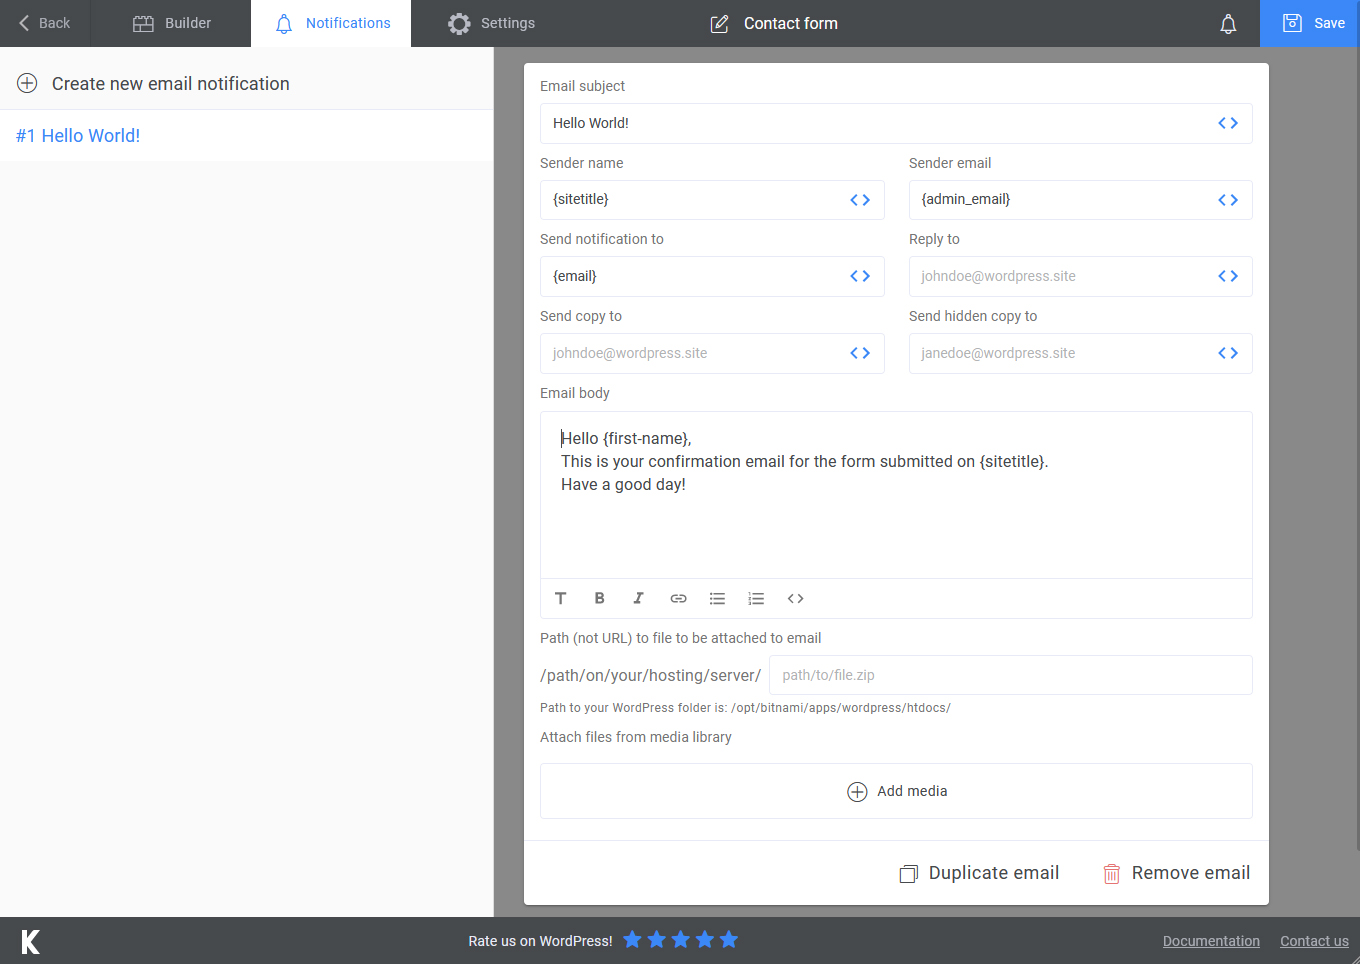
- Email subject: the subject of the notification. The name of the email is automatically generated from the subject field. This is only meant to help you differentiate between the emails you configure for your form.
- Sender name: the name of the email sender.
- Sender email: the email address that sent the notification.
- Send notification to: the recipient of the email notification, this can be either the submitting user or the site admin.
- Reply to: the email that will be used when the recipient uses the Reply option from his email account.
- Send copy to: the email that will receive a carbon copy of the notification.
- Send hidden copy to: the email that will receive a blank carbon copy of the notification.
- Email body: the actual message of your notification.
If you want to send multiple notifications to different recipients, then you can take advantage of the Duplicate email option and save a lot of development time. This will create an exact copy of your email that you can then adjust for a different recipient.
You can use the following placeholders to send website or submission related information in the email notifications.
General placeholders
- {sitetitle} – the title of the website the form was submitted on.
- {tagline} – the slogan of the website.
- {siteurl} – the WordPress Address (URL).
- {homeurl} – the website URL.
- {admin_email} – the email of the website admin, as configured in the WordPress Settings >> General.
- {thisPermalink} – this will return the URL of the current page.
Form specific placeholders
- {field-name} – you can send the information submitted in a particular field by using the field name in the placeholder syntax.
- {submission_link} – if you are using the Submissions add-on, this will return the URL of the page that displays the form submissions.
- {entryCounter} – this will return the number of entries for your current form.
- {formName} – this will return the current form name.
- {ip_address} – this will return the IP of the submitting user.
- {allFields} – this will return a list of all your form fields and the submitted values, each field will be displayed on a new line.
- {upload-field-name:image} – when using an upload field in your form, this will help display the uploaded image in the body of the email.
The email notifications also support attachments. You can attach a file already uploaded on your server or a file added through a File upload field in your form.
1. Attaching a file already available on your server.
This can be done in two ways:
- By adding the path to the file.
- By selecting the file from your WordPress Media Library.
2. Attaching a file added through a File upload field.
When an upload field is available in the form a checkbox group will be generated in the form Notifications configuration, just select the field and the file uploaded through it will be attached to the email.
