Having a contact form on your website is crucial if you want to let potential customers and clients get in touch with you. There are plenty of contact form plugins for WordPress and one of the most popular plugins to create one is WPForms. But what happens when WPForms is not sending emails?
In other words, when a potential client reaches out to you, your WordPress website never sends you that email, which means potential client inquiries go unanswered. Needless to say, this is not only bad for business but also for your brand image.
In this post, we’ll explain what’s causing this issue and how you can fix it.
Table of contents
Why WPForms Is Not Sending Email
Not getting the emails that a potential client has filled out in your contact form is not only a lost sales or relationship-building opportunity, but it’s also a frustrating issue. There are a few common reasons why WPForms might not be sending emails from your website or notifying you of new submissions. Let’s explore those reasons now.
- Your host is not configured to use the mail function – The most common reason why WPForms is not sending email is the fact that your hosting company is not configured to use the mail function WordPress uses to send emails generated by contact form plugins like WPForms.
- Your email server might be blocking the email as spam – Another reason why you’re not getting emails generated by your contact form plugin is that your email server might falsely interpret the email as spam. In essence, when someone fills out a contact form on your site, your email provider will check if the email comes from where it claims to come from. So if someone sends you an email from Gmail.com and the email says it’s coming from yoursite.com, your email provider will block the email before it even has the chance to reach your inbox or spam folder. This is done in an effort to reduce the number of spam submissions.
- Your notification settings are incorrect – Finally, your email notifications are not configured to the correct address. You might have missed this step when creating your contact form or mistyped your email address. Although not as common as the other two reasons, it’s worth double-checking the notification settings in WPForms.
How to Fix WPForms Not Sending Email
So now that you know what’s causing the problem, let’s take a look at how you can fix it to make sure you never miss an important email from your website again.
Solution 1: Check Form Notification Settings
As mentioned earlier, it’s a good idea to check your form notification settings and make sure everything is correct. To do this go to WPForms > All forms. Hover over the form you want to double-check and click on Edit. Then, click the Settings icon and check the following:
- Make sure all emails are spelled correctly and that multiple emails are separated by a comma.
- Avoid using the same email address for the Send To Email Address and From Email Address fields as this can trigger spam filters in some email providers.
- Make sure there is only one email listed in the From Email field.
If all those settings are correct and you’re still not receiving emails, proceed to the next step.
Solution 2: Use a Different Contact Form Plugin
Another solution is to use a contact form plugin that comes with a built-in functionality for using the SMTP protocol to send emails.
Kali Forms fits the bill perfectly as it allows you to choose between several SMTP providers. Let’s take a look at how you can set up Kali Forms with SMTP settings.
Step 1: Install Kali Forms
Go to your WordPress dashboard and navigate to Plugins > Add new. Search for Kali Forms, install, and activate the plugin.
Step 2: Configure Email Settings
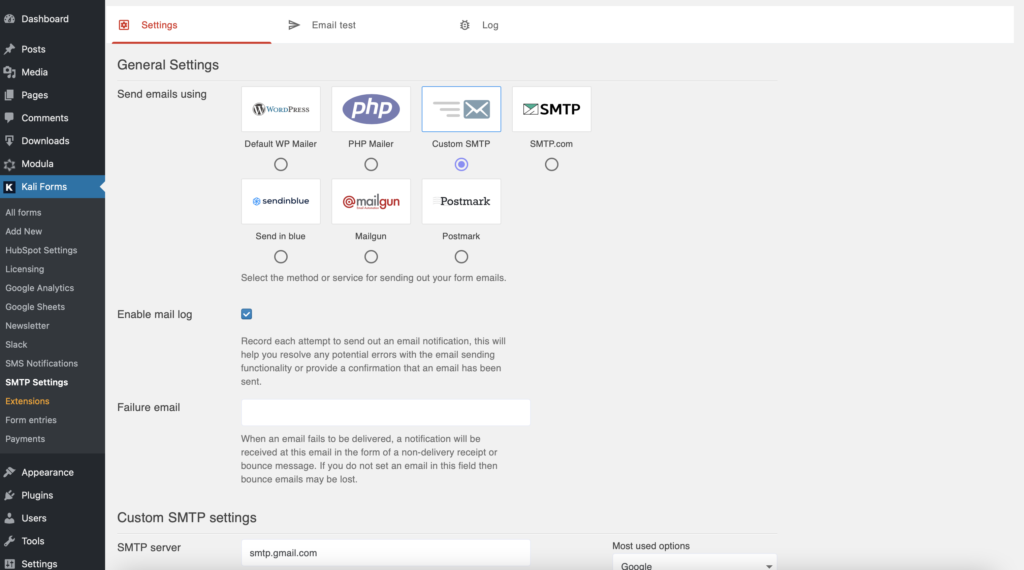
Once Kali Forms has been installed, go to Kali Forms > SMTP Settings. Here you can choose to send emails by using Default WP Mailer, PHP Mailer, Custom SMTP, SMTP.com, Sendinblue, Mailgun, and Postmark. For our tutorial, I’ll use Custom SMTP.
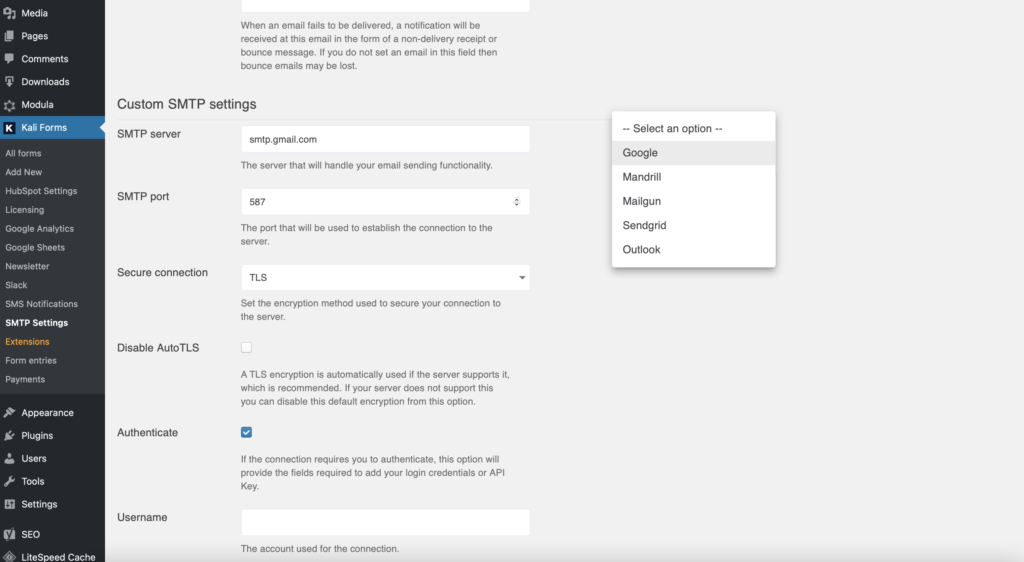
If you scroll down, you’ll see a box with most used options.
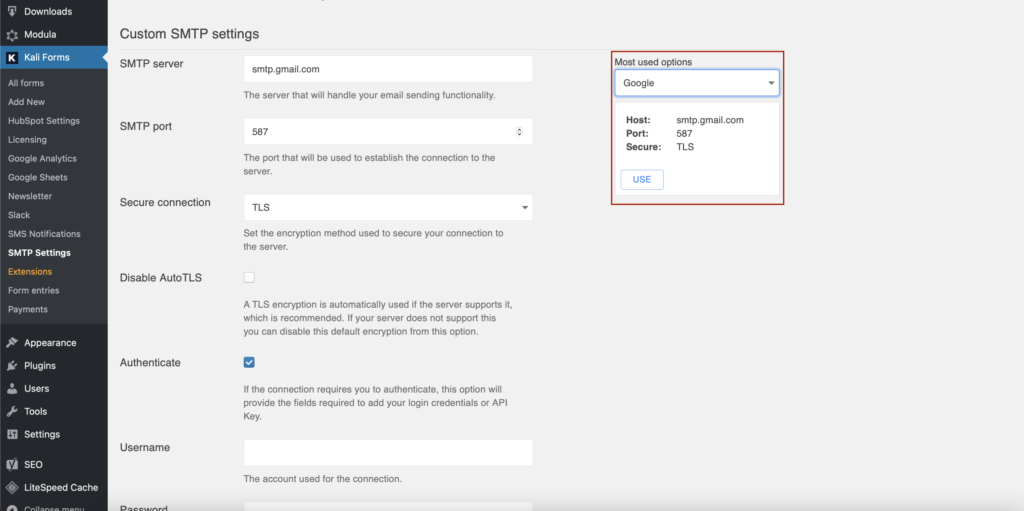
As you can see from the screenshot, you can choose between Google, Mandrill, Mailgun, Sendgrid, or Outlook. Keep in mind that you will need to create an account with these services before configuring them in your WordPress dashboard.
Once you have an account with one of these services, you need to configure the settings. The process is rather straightforward. In this example, I’m using Gmail.
The plugin will pre-fill the SMTP settings for the corresponding service and you can see the settings if you tick the Custom settings box.
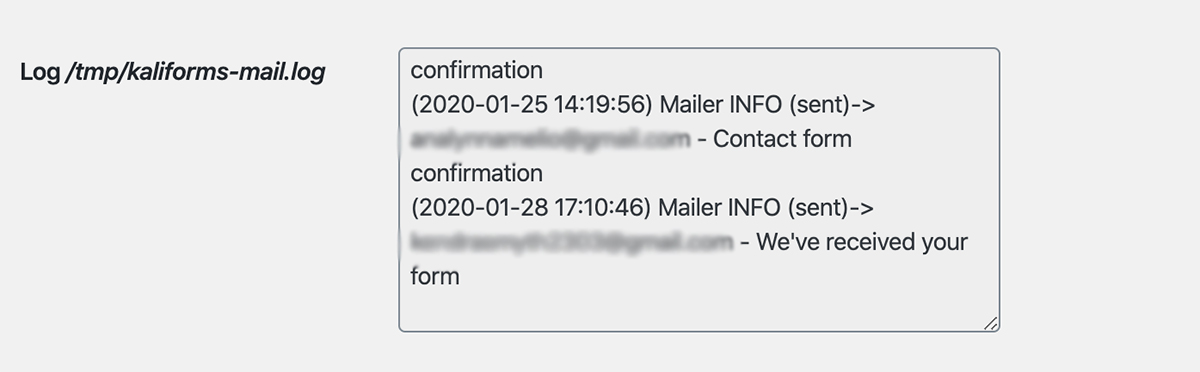
All you have to do here is tick the Require Authentication box and enter your username and password for the chosen service; in this case Gmail. Be sure to also tick the box next to the debug log so you can troubleshoot any issues.
When you have entered all the information, simply click Save. You can then test your contact form. Kali Forms comes with a preinstalled contact form for you so you can use it for testing purposes or create a completely new form from scratch.
To keep things simple, I’m using the premade form so all I need to do is add the form’s shortcode to my contact page. Then, I can test the contact form and if everything is configured properly, the information about the submitted form will be visible in the debug log.
Step 3: Configure Your From Name
The next step is to configure the From Name which by default is set to the your site’s name. You can customize this to your liking and check the box to force the From Name.
Be sure to tick the box next to the option for Return Path as this will make sure that any emails that bounce will be returned to your email address.
Step 4: Select Your Mailer
Once your name and email have been configured, you’ll need to select the Mailer to use for your SMTP settings.
In this example, we’ll use Gmail.

Step 5: Configure Gmail
You’ll have to enter a Client ID and Client Secret which you can obtain by creating an application in your Gmail account. To create this app, login to your Gmail account and register a Gmail API application.
You’ll need to accept their TOS and click on the Agree and Continue button.
Once the application has been created, you’ll see a notification along with a button prompting you to see the credentials.

Click the blue button and then answer a few questions so Google knows which credentials you need:
- Which API are you using? Gmail API
- Where will you be calling the API from? Web server (e.g. node.js, Tomcat)
- What data will you be accessing? User data

Click the What Credentials do I need link and then Google will ask you to setup a consent screen so go ahead and start the setup process.

On the screen that opens up, you’ll need to select whether the User type is External or Internal. If you’re using regular Gmail, select External and proceed with the rest of the setup.

You’ll then need to fill out the rest of the details for your app. The information that’s required here is your application name which you can set to your website name and the authorized domains.

Here, enter the URL for your website without the https://. You can enter the same URL in the Application Homepage link, Application Privacy Policy link, and Application Terms of Service link. The reason you don’t need to link to your Privacy Policy is because this consent screen will never be seen by your users.
When you’re done, click Save. You’ll then be taken back to the OAuth consent screen. Since there’s nothing to do on this screen, go back to Credentials and click on Create an OAuth client ID.

You can enter any name you want in the Name field since this won’t be used anywhere else other than for reference in your Google account. In the Authorized JavaScript origins field, you’ll need to enter your website address.
In the Authorized redirect URIs field, go back to your WordPress dashboard and back to the WP Mail SMTP Settings page. Look for the field labeled Authorized redirect URI. Copy that and paste it in Google’s OAuth settings screen.
Click the Refresh button and then click the blue Create OAuth client ID button.
You’ll then see a screen with your Client ID generated with the option to download the credentials or do it later. Click on I’ll do this later and go to the Credentials page.
When the Credentials page loads, click the pencil icon next to your application. You’ll then be able to copy and paste the Client ID and Client secret values to your WordPress website in WP Mail SMTP settings.
Step 6: Authorize Plugin to Use Gmail
Once you’ve pasted the Client ID and Client Secret, save the changes. You’ll then need to click the button that says Allow plugin to send emails using your Google account.

Login to your Gmail account and grant permissions for your website to send email on your behalf by clicking the Allow button.
You’ll then be redirected to your site and see a success message that everything has been configured and connected successfully. You can test the configuration by sending a test email under the Email Test tab.

Consider Using KaliForms — a WPForms Alternative
If you’re finding WPForms difficult to use or if you don’t want to go through the trouble of installing and configuring another plugin, consider using Kali Forms.

Kali Forms is a WP Forms alternative that has an easy to use drag and drop editor and allows you to create simple contact forms as well as more complex surveys or payment forms.
Kali Forms also comes with built-in form templates that you can use instead of building forms from scratch. The plugin is mobile-responsive and comes with the ability to enable Google reCaptcha to minimize the chances of spam submissions.
You can download Kali Forms for free from the official repository and create a great-looking contact form for your website and if you need more functionalities you can choose to upgrade to one of the PRO plans.
Final Thoughts
WPForms not sending email is a common issue among many WordPress users. The good news is that this issue can be fixed. But it does require installing another plugin on your site to do it.
If you’d rather avoid the troubleshooting game and installing another plugin, consider using KaliForms as an alternative. You can get started for free and upgrade to the paid version as your business grows.